In the last post, we discussed how one can display the data retrieved from HealthVault Emotional State data-type.
I showed an interesting LINQ query which sort the HealthVault items returned from a getthings. Well actually turns out that we can do this more efficiently by using the max attribute on group filter in the getthings. The items returned by HealthVault are sorted by eff-date and if we get the first one it should be the latest item!
.csharpcode, .csharpcode pre { font-size: small; color: black; font-family: consolas, “Courier New”, courier, monospace; background-color: #ffffff; /white-space: pre;/ } .csharpcode pre { margin: 0em; } .csharpcode .rem { color: #008000; } .csharpcode .kwrd { color: #0000ff; } .csharpcode .str { color: #006080; } .csharpcode .op { color: #0000c0; } .csharpcode .preproc { color: #cc6633; } .csharpcode .asp { background-color: #ffff00; } .csharpcode .html { color: #800000; } .csharpcode .attr { color: #ff0000; } .csharpcode .alt { background-color: #f4f4f4; width: 100%; margin: 0em; } .csharpcode .lnum { color: #606060; }
        <span class="kwrd">public</span> <span class="kwrd">static</span> <span class="kwrd">void</span> GetThings(<span class="kwrd">string</span> typeId, <span class="kwrd">int</span> maxItems,
            EventHandler<HealthVaultResponseEventArgs> responseCallback)
        {
            <span class="kwrd">string</span> thingXml = @"
            <info>
                <group max=<span class="str">'{0}'</span>>
                    <filter>
                        <type-id>{1}</type-id>
                        <thing-state>Active</thing-state>
                    </filter>
                    <format>
                        <section>core</section>
.csharpcode, .csharpcode pre { font-size: small; color: black; font-family: consolas, “Courier New”, courier, monospace; background-color: #ffffff; /white-space: pre;/ } .csharpcode pre { margin: 0em; } .csharpcode .rem { color: #008000; } .csharpcode .kwrd { color: #0000ff; } .csharpcode .str { color: #006080; } .csharpcode .op { color: #0000c0; } .csharpcode .preproc { color: #cc6633; } .csharpcode .asp { background-color: #ffff00; } .csharpcode .html { color: #800000; } .csharpcode .attr { color: #ff0000; } .csharpcode .alt { background-color: #f4f4f4; width: 100%; margin: 0em; } .csharpcode .lnum { color: #606060; }Before we get to the topic of this post and discuss how we can put new items in to HealthVault, here a screen shot of how the application looks like once we have enabled the put and prettied up the last reading a little bit –
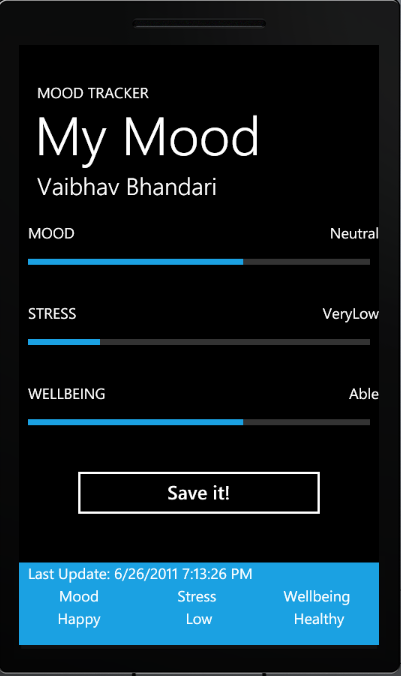
Fig 1. MoodTracker with put enabled!
We can see that for each of the states i.e mood, stress and wellbeing we have a nice slider which lets the user capture their state and we can want this information uploaded with current time stamp once the user hits Save!
        <span class="rem">// Save the reading to HealthVault</span>
        <span class="kwrd">private</span> <span class="kwrd">void</span> button1_Click(<span class="kwrd">object</span> sender, RoutedEventArgs e)
        {
            EmotionalStateModel model = <span class="kwrd">new</span> EmotionalStateModel();
            model.Mood = (Mood)c_MoodSlider.Value;
            model.Stress = (Stress)c_StressSlider.Value;
            model.Wellbeing = (Wellbeing)c_WellbeingSlider.Value;
            model.When = DateTime.Now;
            HealthVaultMethods.PutThings(model, PutThingsCompleted);
            SetProgressBarVisibility(<span class="kwrd">true</span>);
        }
.csharpcode, .csharpcode pre { font-size: small; color: black; font-family: consolas, “Courier New”, courier, monospace; background-color: #ffffff; /white-space: pre;/ } .csharpcode pre { margin: 0em; } .csharpcode .rem { color: #008000; } .csharpcode .kwrd { color: #0000ff; } .csharpcode .str { color: #006080; } .csharpcode .op { color: #0000c0; } .csharpcode .preproc { color: #cc6633; } .csharpcode .asp { background-color: #ffff00; } .csharpcode .html { color: #800000; } .csharpcode .attr { color: #ff0000; } .csharpcode .alt { background-color: #f4f4f4; width: 100%; margin: 0em; } .csharpcode .lnum { color: #606060; }Lets get a bit deeper in how the PutThings call works. It fetches the relevant information from the base object and submits that to HealthVault. The design in this case might be a little wary since the put parameters are coming from the emotional state object as well.
        <span class="rem">/// <summary></span>
        <span class="rem">/// PutThings Method</span>
        <span class="rem">/// </summary></span>
        <span class="rem">/// <param name="item">The health item to upload</param></span>
        <span class="rem">/// <param name="responseCallback">Function to resolve callback</param></span>
        <span class="kwrd">public</span> <span class="kwrd">static</span> <span class="kwrd">void</span> PutThings(HealthRecordItemModel item,
            EventHandler<HealthVaultResponseEventArgs> responseCallback)
        {
            XElement info = XElement.Parse(item.GetXml());
            HealthVaultRequest request = <span class="kwrd">new</span> HealthVaultRequest(<span class="str">"PutThings"</span>, <span class="str">"2"</span>, info, responseCallback);
            App.HealthVaultService.BeginSendRequest(request);
        }
Voila!! We have an application which can read and update information to HealthVault!
Next Time: We will focus on adding the History or Charting aspects of this application!