Last time we figured out how to associate our application with HealthVault. In this post we will focus on reading data from HealthVault.
So the data type we settled on was EmotionalState, we can find a sample xml for this type on the HealthVault Developer Center.
Out first goal is to be able to display this type in our application. We need test data for emotional state so we add test information to our developer account from type samples.

Fig 1. Adding Emotional State sample to HealthVault record.
Please note: You need to be signed in to developer.healthvault.com to add the above sample.
We can verify that this sample is added to our record by using the HealthExplorer.
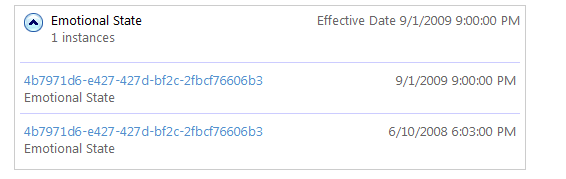
Fig 2. Emotional State Samples in developer account.
The easiest way to get-things from HealthVault is using the GetThings version 3 method. A Get on things can be performed using various filters for the purposes of this application which just retrieve all the active things of type Emotional State.
HealthVaultMethods.GetThings(EmotionalStateModel.TypeId, GetThingsCompleted);
To make it easier to work with GetThings I implemented a simple abstraction on the method in HealthVaultMethods class.
Now once we can get thing emotional state things we need to perform two things on the client side.
- Sort them in the date order and pick the latest one
For this item Linq to XML comes in very handy, just in three lines we can make this query work!
 <span class="rem">// using linq to get the latest reading of emotional state</span>
 XElement latestEmotion = (from thingNode <span class="kwrd">in</span> responseNode.Descendants(<span class="str">"thing"</span>)
         orderby Convert.ToDateTime(thingNode.Element(<span class="str">"eff-date"</span>).Value) descending
         select thingNode).FirstOrDefault<XElement>();
.csharpcode, .csharpcode pre { font-size: small; color: black; font-family: consolas, “Courier New”, courier, monospace; background-color: #ffffff; /white-space: pre;/ } .csharpcode pre { margin: 0em; } .csharpcode .rem { color: #008000; } .csharpcode .kwrd { color: #0000ff; } .csharpcode .str { color: #006080; } .csharpcode .op { color: #0000c0; } .csharpcode .preproc { color: #cc6633; } .csharpcode .asp { background-color: #ffff00; } .csharpcode .html { color: #800000; } .csharpcode .attr { color: #ff0000; } .csharpcode .alt { background-color: #f4f4f4; width: 100%; margin: 0em; } .csharpcode .lnum { color: #606060; }
- Parse them for the mood, stress and wellbeing data.
We can achieve this my creating a model for Emotional State. Have a good model makes if super easy to parse the XElement to the object we need –
 EmotionalStateModel emotionalState =
     <span class="kwrd">new</span> EmotionalStateModel();
     emotionalState.Parse(latestEmotion.Descendants(<span class="str">"data-xml"</span>).Descendants(<span class="str">"emotion"</span>).Single());
XElement and lazy evaluation makes our job super-simple, compared to XPathNavigator -
<p> <span class="kwrd">public</span> <span class="kwrd">void</span> Parse(XElement emotionalState)
 {

        <span class="kwrd">this</span>.Mood = (Mood) System.Enum.Parse(<span class="kwrd">typeof</span>(Mood),
           ((XElement)emotionalState.Element(<span class="str">"mood"</span>)).Value, <span class="kwrd">true</span>);
        <span class="kwrd">this</span>.Stress = (Stress) System.Enum.Parse(<span class="kwrd">typeof</span>(Stress),
            ((XElement)emotionalState.Element(<span class="str">"stress"</span>)).Value, <span class="kwrd">true</span>);
        <span class="kwrd">this</span>.Wellbeing = (Wellbeing) System.Enum.Parse(<span class="kwrd">typeof</span>(Wellbeing),
            ((XElement)emotionalState.Element(<span class="str">"wellbeing"</span>)).Value, <span class="kwrd">true</span>);
 }</p><p> </p><p>Now we are ready to show the latest emotional state reading!!</p><p> </p><p><a href="/assets/images/2011/06/image5.png"><img src="/assets/images/2011/06/image_thumb5.png" style="padding-left:0;padding-right:0;padding-top:0;border-width:0;" title="image" height="332" width="199" alt="image" border="0"></img></a></p>
Fig 3. Latest Emotional State Reading in Mood Tracker!
**Next Time: **We will look at how we can enter new data with Mood Tracker!